Ambient LED Lighting
SVPlight is a program for managing LED ambient lighting equipment similar to Philips Ambilight, for example, Lightpack.

|

|
If you have not added SVPlight during SVP installation, you can install it later using the Maintain SVP 4 application (see the Additional Components section). In SVP 4 Mac, it is necessary to mark the Main Menu option → Application settings → Additional options → Extensions → svplight.
If SVPlight is installed, the LED lighting option appears in the SVP main menu.

Connecting the Equipment
SVPlight is compatible with Lightpack and Paintpack devices, as well as with Prismatik, Boblight and Hyperion programs that are commonly used to control various LED equipment.
To enable SVP to operate your equipment:
- Connect the equipment to the computer, attach the LEDs to the monitor or TV.
- If needed, run the control program (Prismatik,Ambibox or Boblight server) and configure the equipment (see the Prismatik and Ambibox operation manuals).
- Select the Setup hardware option in the LED lighting menu of the SVP Main Menu. The LED hardware section will open.
- Select the type of equipment and how it is connected:
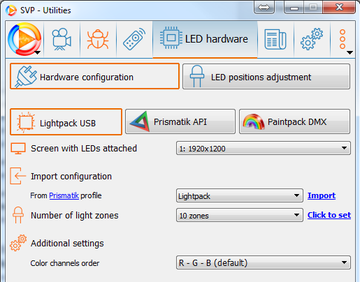
- Lightpack – direct control of Lightpack devices, without using the Prismatik.
- Prismatik – control of LED equipment with the help of either Prismatik or Ambibox program.
- Paintpack – direct control of Paintpack devices.
- Boblight - control of LED equipment via remote Boblight / Hyperion server.
- If multiple monitors are connected to the computer, select the one to which the LEDs are attached from the Screen with LEDs attached list.
- Select the number of LEDs and the order of color channels and click Click to set. You can also import these settings from Prismatic or Ambibox by selecting corresponding profile name from the list and clicking Import.
- If everything is connected correctly, LEDs will turn on and the LED positions adjustment section will open.
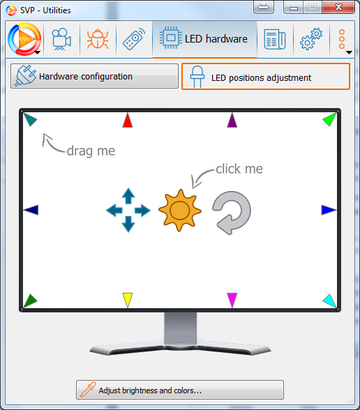
- Adjust the exact position of LEDs attached to the monitor or TV. A colored triangle on the diagram corresponds to each LED, and the LED shows the same color. You need to drag each triangle to the correct place in the diagram. To make it easier, you can turn on fullscreen mode by clicking the Toggle full screen mode icon. To quickly verify that the specified locations are correct, click Turn running lights effect on or off.


Using LED Lighting
To turn on LED lighting, select Turn on in the LED lighting submenu of the SVP Main Menu. This can also be done by using the Toggle LED lighting keyboard shortcut.

The lighting will turn on automatically when the video playback starts and will turn off after the player is closed or playback paused. For comfortable video watching with background LED lighting, it is important to accurately configure it. The lighting should not distract from watching the video and switch the attention to the lighting itself. To configure the lighting during video playback, select Adjust brightness and colors in the LED lighting sub-menu – the LED lighting section of the Control Panel will open. The following controls are available:

- Brightness – changes the overall brightness of the LEDs.
- Gamma – determines how the brightness of the LEDs depends on the brightness of the video. Bigger gamma brings more lighting to dark areas of the video.
- Saturation – changes the LED colors so that the lower the saturation is, the whitish LED colors are.
- Color correction – allows correction of the LED colors if the light hits the colored surface (wall). First, specify the color of the surface (wall) itself. Then adjust the color so that the light on the wall looks as close to white as possible.
- Smooth motion – performs smoothing of the light changes over time, defines the speed of the lighting response to changes in the video.
- Delay – allows you to choose a delay (in milliseconds) to synchronize the lighting and the video. You may need this because in some cases lighting is triggered earlier than necessary.