Re-encode video to high frame rate with SVPcode
SVPcode re-encodes virtually any video file into high frame rate, preserving all audio and subtitle tracks contained in the source video.
Installation

To add SVPcode, select it during the installation of SVP, or install it using the Maintain SVP 4 application (see the Additional Components section). In SVP 4 Mac, it is necessary to mark the Main menu option Application settings → Additional options → Extensions → svpcode.
After that, the Transcoding sub-menu is displayed in the SVP Main menu.
You should pre-install mpv with Vapoursynth support and either mkvmerge (preferable choice) or ffmpeg on computers running macOS or Linux.
SVPcode Usage

- (optional) Set temporary and output folders using the Main menu.
- Click the Browse for a video file to transcode... button and choose one or several video file(s). Note: it won't work directly from the network share, you have to mount network drive first!
- Choose a video profile for a frame rate conversion:

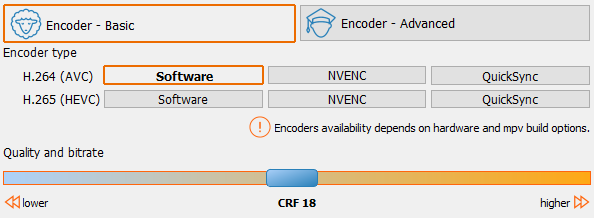
- Set video compression options via either Basic or Advanced section:
- Basic settings give a choice between H.264 or H.265 codec and software (x264/x265) or hardware encoders. You can set compression quality in terms of "CRF" or bitrate values:
- With Advanced settings you can set any encoder supported by ffmpeg and define a set of encoder-specific options:
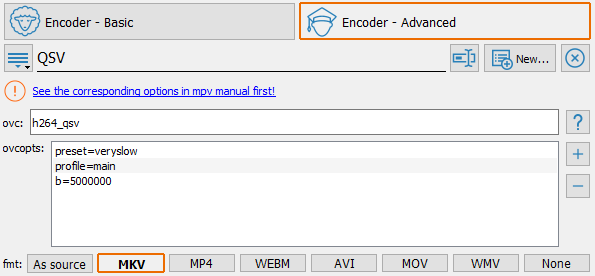
To view a complete list of available codecs and options press the ? button.
You can organize those options in a "encoder profiles" in a way similar to the SVP's video profiles.
- Basic settings give a choice between H.264 or H.265 codec and software (x264/x265) or hardware encoders. You can set compression quality in terms of "CRF" or bitrate values:
- Press Start to start a video conversion process:

While encoding, you can enqueue more files as well as pause or cancel transcoding process.


Frequently Asked Questions
Which hardware encoders are supported?
ffmpeg supports following encoders depending on the OS:
- Windows: Intel QuickSync, NVIDIA NVENC, AMD AMF,
- macOS: system-provided Videotoolbox API,
- Linux: Intel QuickSync, NVIDIA NVENC.
Encoders availability depends on video drivers installed and mpv build options.
NVENC encoder doesn't work!
Update NVidia video drivers - the minimal version compatible with ffmpeg 4.0 is 390.77.
I have two NVidia cards. Is there a way to specify GPU encoding device?
Set gpu=N in Advanced settings. N selects which NVENC capable GPU to use. First GPU is 0, second is 1, and so on.
How to add a watermark / logo?
Via lavfi filters:
movie=d\\:/logo-48.png [watermark], [in][watermark] overlay=10:main_h-overlay_h-10 [out]
