Increasing the Frame Rate / Profiles
The main task of SVP is calculating the intermediate frames and adding them to the video stream. This task involves multiple parameters and options. For changing the settings on the fly, video profiles can be used. General settings that you do not need to change frequently, are specified in the SVP Main Menu.
About the Profiles
Profile is a set of options for calculating new frames during motion interpolation. You can create multiple profiles and select the optimal settings for playing back different types of video. By default, SVP uses the Automatic profile with a set of options selected based on your computer performance. The Automatic profile cannot be renamed or deleted. Also, for the Automatic profile, you cannot manually change the settings and conditions of use.
A profile includes:
- profile name;
- target frame rate;
- options for calculating intermediate frames;
- conditions of profile use.
When a video plays back, the options from the profile that matches most by the conditions for its applying are used.
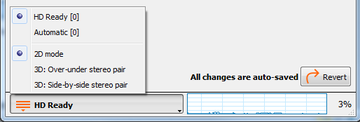
Any change to the profile is saved automatically; however, until another profile will be selected, the changes can be undone by clicking the Revert button.

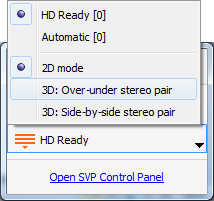
You can view a list of all profiles and switch between them via the List all video profiles menu button.
During video playback, switching to another profile from the list in this window will not replace the profile currently used for the video. For more information, see the Using a Profile section.
Adding a Profile

To add a new profile:
- Open the Video profiles section of the Control Panel.
- Select any profile from the list and click the New button. A new profile will open, with all the options and conditions copied from the current one.
- Specify the settings for the new profile:
- Enter a name for the profile. You can rename the profile later by clicking the Modify profile title button. You cannot rename the Automatic profile.
- If you want SVP to increase the frame rate of the video, click the Do frame rate conversion button. You can also disable this function. With this function disabled, SVP will continue to process the video, for instance, continue to crop or highlight black bars. To completely disable SVP during video playback, click the Temporarily disable SVP button.

- Select the resulting frame rate. By default, as well as in the Automatic profile, this rate is equal to the screen refresh rate.By using the corresponding buttons and the additional menu on the Other target frame rates button, you can select the following values:
- multiples of the initial frame rate of the video being played back: х2, х2.5, х3, х4, х5;
- fractions of the screen refresh rate: /1, /2, /3;
- fixed frame rates: 45 fps, 48 fps, 50 fps, 60 fps, 72 fps, 75 fps, 90 fps, 120 fps. Other values can be specified using a numerical option "fi_target" in the Application settings section of the Control Panel.

During playback of a video with variable frame rate, it is recommended that you set the double frame rate (x2).
- If needed, change the options for calculating intermediate frames. See the Automatic options selection and the Manual options selection sections.
- Select the conditions for applying the profile in the Apply this profile IF list (see the Conditions for applying the profile section).
To delete the profile that is currently selected, click the Delete profile button. You cannot delete the Automatic profile.
Automatic Options Selection
If you press the Automatic option selection button, SVP will automatically select the options based on the computer performance and video characteristics to ensure the maximum quality of the video while maintaining the system workload at average level.

In some cases, the algorithm that selects options can make a mistake, which results in:
- too high CPU load, or
- too low CPU load, however with the lower values selected for the settings than the values that provide the maximum quality.
In these cases, using the Higher performance / Higher quality slider control, you can shift the limit of the allowed CPU load that the algorithm currently uses. The more left the slider is shifted, the lower values for the options will be selected. The more right – the higher values, but not higher than the values that provide maximum quality according to the developers of SVP. For example, for a powerful eight-core system, the same "maximum" values will always be selected for most video formats, regardless of the position of the slider.
You can use the following additional options:
- Optimized for Film/Animation – The Animation mode uses calculation options optimized for hand-drawn animations (cartoons), which are characterized by sharp contrasting borders of objects and a static background.
- Artifacts masking – Three levels of additional suppression of calculation errors (artifacts) appearing on intermediate frames. High levels of artifact suppression reduce the effect of smooth movements and image clarity.
The algorithm, which selects the options, is based on the results of the computer performance measurement, which has been performed when you first run SVP after installation. You can repeat this measurement manually by selecting the Utilities → Assess system performance command from the Main menu.


Before launching the measurement, close all resource-intensive applications, for example, web browsers.
Manual Options Selection

To switch to manual mode, turn off the Automatic options selection mode.
Manual mode is not recommended for novice SVP users because the user needs to understand the consequences of changing each option as well as its meaning. Setting all options to the maximum possible values will worsen the quality of motion interpolation and significantly increase the load on the system.
It is important to understand that you should find a balance between the video smoothness and the number and visibility of artifacts (visible errors) in the calculated intermediate frames. Greater smoothness always results in more noticeable artifacts, and the reduction in the number of artifacts always reduces smoothness.
There is no perfect set of options that gives maximum smoothness without artifacts.
In the manual mode, the following options are available:
- Rendering options – options of this group affect the creation of an interpolated frame based on the already deduced motion vectors ("motion compensation"). Most of this work is performed on GPU and does not affect the CPU load.
- Frames interpolation mode – defines the ratio of the number of source frames to the number of interpolated frames. The lower the number of interpolated frames are inserted, the lower the smoothness is, but also the lower number of artifacts are introduced.
- 2m (min artifacts) – the minimum number of interpolated frames. For example, if the frame rate is increased up to 2.5 of the original rate, each original frame is repeated twice.
- 1m (average mode) – each original frame is used once.
- 1.5m (less artifacts) – similar to the 1m mode, but the interpolated frames are closer in time to the original frames, which reduces the visibility of artifacts.
- Uniform (max fluidity) – uniform interpolation gives the greatest possible smoothness, but in some cases (a non-integer coefficient for increasing the frame rate) results in most frames being interpolated thus increases artifacts visibility.
- Adaptive – automatic mode selection for every frame, depending on the quality of the deduced motion vectors. In the scenes, which are difficult to analyze, the smoothness will decrease.
- SVP shader – an algorithm for interpolated frame calculation that uses two or more source frames and the deduced motion vectors:
- 1. Fastest (slow PCs) – the fastest algorithm that is useful for systems with slow CPU and without GPU.
- 2. Sharp (anime) – this algorithm gives sharp images, because it does not blend neighboring frames; recommended for hand-drawn animation.
- 11. Simple Lite – an algorithm with simple blending of frames based on the motion.
- 10. By blocks (CPU only) – this algorithm uses simple blending, but performs motion compensation by image blocks rather than by pixels. It runs noticeably faster than the others if GPU is not used.
- 21. Simple – this algorithm uses simple blending and applies masking, which helps reduce halos around moving objects and at frame edges.
- 13. Standard – a variant of 11th algorithm, without masking, but giving more smoothness with some increase in the visibility of artifacts.
- 23. Complicated – an algorithm with the most complex masking.
- Artifacts masking – additional masking of possible distortions of the frame areas with unreliable motion vectors. These areas can be overlaid with the areas of the original frames with some degree of transparency. The stronger the masking is, the blurrier image and the worse smoothness will be.
- Disabled – no masking is used;
- Weakest, Weak – the optimal values will be used;
- Average – can result in appearance of specific artifacts, for example, triple edges;
- Strong, Strongest – the maximum values will be used; not recommended for use.
- Frames interpolation mode – defines the ratio of the number of source frames to the number of interpolated frames. The lower the number of interpolated frames are inserted, the lower the smoothness is, but also the lower number of artifacts are introduced.
- Motion vectors options – the options for the search of motion vectors ("motion estimation"). All the options of this group significantly affect the CPU load.
- Motion vectors precision – a higher accuracy in the search for motion vectors increases the smoothness of slow motion such as slow moving closing credits on a black background. High accuracy dramatically increases the use of RAM, especially if no GPU is used. For example, for playing back a video of Ultra HD format, more than 5 GB of RAM might be required for high accuracy.
- Motion vectors grid – the motion vector search algorithm works with small blocks of the video frame. The smaller these blocks are, the more likely you’ll find motion of small objects, with more wave artifacts noticeable at the edges of objects.
- Decrease grid step – additional refinement of motion vectors while reducing block sizes twice.
- Search radius – the range of motion vector search, limits the maximum length of the vector and the degree of "fluidity" of the image. The larger the radius is, the more likely you’ll get a wrong vector, resulting in more interpolation artifacts.
- Small and fast –- does not allow using the more resource-intensive SADT function to compare image blocks;
- Small, Average, Large.
- Wide search – a last attempt to find the motion vector with a larger radius in case if regular search did not provide a good enough result.
- Width of top coarse level – for hierarchical search of motion vectors, at different levels different search options are used – particularly, at the last levels (the largest ones), more simple options are used to reduce the CPU load. The smaller this value is, the larger number of high levels will have the lower options.
- Miscellaneous options
- Processing of scene changes – the method of creating intermediate frames at the moments of scene change, that is, when there are no motion vectors available:
- Blend adjacent frames – intermediate frames are created using simple blending of two frames; this results in smooth transition between scenes;
- Repeat frame – intermediate frames are copies of original frames; this results in instant scene change.
- Rendering device – allows using a GPU device different from the one specified in the Main menu.
- Processing threads – an addition to the Processing threads value set in the Main menu. The number of calculation threads directly affects how much RAM will be used.
- Processing of scene changes – the method of creating intermediate frames at the moments of scene change, that is, when there are no motion vectors available:
- User defined options –- arbitrary options that you can add via the Application settings section in the Control Panel and then use in the JavaScript code. See the Management of the script generation section.
Using a Profile
Once the video starts playing back, SVP selects the most appropriate profile and calculates the intermediate frames by using the profile options. For automatic profile selection, SVP uses the conditions specified in each profile (see the Conditions for applying the profile section).
To use the settings from a specific profile, select the profile from the Profile for an active video menu. You can access this menu in one of the following ways:
- Locate it in SVP Main menu.
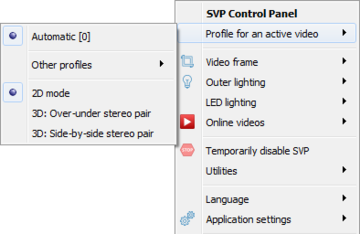
- Click the profile name at the bottom of the Control Panel window.
- Left-click the SVP icon in the notification area.


Also, use the Cycle to the next video profile keyboard combination (see the Hotkeys section) for cyclic switching of matching profiles.
Conditions for Applying the Profile

If a video meets the conditions of several profiles, the profile with the largest number of conditions is applied (for more details, see the description of the condition Expert: add scores).
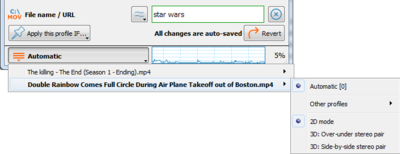
Each condition consists of three elements: the "object", "relation" and "value". For example: "frame width", "greater than", "1000 pixels", or "file name", "contains", "star wars".

To add a condition, click Apply this profile IF button, select the "object" in the list and specify both "relation" and "value". If you add a condition to the profile during a video playback, actual value is automatically placed into the "value" field, otherwise the field remains empty.

You can set conditions for the following "objects" and "relations".
- Basic video options:
- Video frame rate – the original frame rate, is greater or less than a value specified, expressed in frames per second.
- Frame width – the frame width after cropping and scaling, is greater or less than a value specified (pixels).
- Frame height – the frame height after cropping and scaling, is greater or less than a value specified (pixels).
- Frame area – the frame area (i.e. width*height) after cropping and scaling, is greater or less than a value specified (megapixels = millions of pixels).
- Source frame area – the frame area before cropping and scaling, is greater or less than a value specified (megapixels).
- Names and paths:
- File name / URL – the file name or URL (in case of a video stream playback through a network) is equal to or contains a specified string. The string can be a regular expression (see below).
- File extension – the file extension is equal to a specified string. The string can be a regular expression.
- Full file path – the full path to a file contains a specified string. The string can be a regular expression.
- Video sources:
- Is network stream – the video is a network video stream, yes or no.
- Video player – the full path to the video player executable file contains a specified string. The string can be a regular expression.
- Additional video options:
- Video codec – the video codec (for example, "avc" or "h264") is equal to a specified string. The string can be a regular expression.
- Color depth – the video color depth is greater or less than a value specified in bits (for example, 8 bits or 10 bits).
- Is stereo – the video is in 3D (stereo) format, yes or no.
- Is interlaced – the video is an interlaced video (for example, DVD or 1080i), yes or no. Such video requires pre-deinterlacing by the video player.
- Computer state:
- Is on battery – the computer runs on battery power, not AC, yes or no. Portable systems often have reduced performance when running on battery.
- Other:
- Each condition (that is met) from the profile’s list adds a certain number of points to the profile score; the score is shown next to the profile name in the profile selection menu. The more points a profile has, the higher priority it has. A profile with the highest score is selected when a video playback starts. Expert: add scores allows you to add any number of points to a profile score to accurately define the profile priority in "disputable cases" when several profiles equally match the video (have the same score).
As string "values", you can use regular expressions which are enclosed by "\" characters. For example, "\mp4|mkv\" – a regular expression, meaning a string which is equal to "mp4" OR "mkv". For in-depth description of regular expressions in use, see Qt’s QRegExp manual.
General Options
General options, that affect the frame rate conversion function, are set in the Main menu and do not require frequent changing. The Application settings menu:

- GPU acceleration – selection of GPU device for use in intermediate frame calculation. This option can be overridden by the video profile.
- No acceleration – no GPU is used. This reduces the calculation quality and significantly increases the CPU load.
- Using <video card name> –- use the specified GPU. For systems combining both dedicated and integrated GPUs, you should select the dedicated GPU if the integrated one performs poorly. On the other hand, in laptops, using an external GPU can degrade battery life and increase heating.
- Additional options

- Assume double frame rate for interlaced videos – SVP does not work with interlaced video (DVD, 1080i); such video must be preliminarily converted to progressive format. This conversion is usually performed in a video decoder. Depending on the conversion algorithm, from the original 50i / 60i video you can get either 25p/30p or 50p/60p video. By using this option, you inform SVP which algorithm you select – with or without frame rate doubling.
- Allow output in 10-bit color depth – allow processing of 10-bit videos without losing quality. Available only in video players based on mpv or VLC. If this option is disabled, the intermediate frame calculation will be always performed in 8-bit color depth, even for a 10-bit sources.
- Running multiple videos – SVP can process multiple videos at the same time; you can select them in Profile for an active video menu:
- Use SVP in all opened videos – process all the video at the same time.
- First opened video only – process only the first opened video. All other videos will be ignored until the first one is closed.
- Latest opened video only – process only the last opened video. SVP work in previously opened videos will be stopped.
- Processing threads – number of calculating threads. Higher values allow better use of the CPU, but require more RAM. Do not set values other than Auto if you are unsure why you are doing this. This option can be overridden by the video profile.
