Installation and Upgrade
The following versions of SVP are available:
- SVP 4 Pro – a full version of the program for Windows. This version of program is available only after purchasing on the SVP website.
- SVP 4 Mac – a full version of the program for macOS. This version is available only after purchasing on the SVP website.
- SVP 4 Linux – a full version of the program for Linux distributed at no cost.
See the feature comparison for all these versions.
SVP 4 Pro Installation
During the process, an active connection to the Internet is necessary. The installer downloads the necessary packages from the SVP website. For the SVP 4 Pro users, there is an "offline" version of the setup program that contains all the packages.
To install SVP 4 Pro:
- Download the setup file from the SVP website or via the link from the email if you have purchased SVP 4 Pro. The link is also available in the License manager (see the Viewing and managing the license section).
- Run the setup file. The installation wizard starts.
- Follow the wizard instructions:
- Select the folder to install SVP.
- Select the players for which SVP integration will be available.
- You can install SVPlight and SVPtube, if needed.
- If needed, you can additionally install the following programs:
- MPC-HC – a popular player, pre-configured to work with SVP;
- madVR – a high-quality video renderer for DirectShow-compatible players;
- ReClock – a DirectShow filter to ensure accurate synchronization of video output with screen refresh rate;
- If necessary, you can perform manual selection by pressing on Switch to components selection button.
- Read and accept the terms of the License Agreement.
- Select the Start menu in which you would like to create the program’s shortcuts.
In case you need a proxy server to connect Internet you may need to specify it on the first screen of the wizard. To do this, press Settings button and either select System proxy settings or specify a proxy server address. Otherwise the installation may be aborted with the following error message:
Could not download archive %NAME%: Connection closed
SVP 4 Mac Installation

SVP 4 Mac requires preinstallation of some system libraries (Python 3, Vapoursynth, and a special build of mpv). For this, we recommend that you use the Homebrew package manager.
To install SVP 4 Mac:
- Download the DMG image via a link from the email you received after purchasing SVP 4 Mac. The link is also available in the License manager (see the Viewing and managing the license section).
- Mount the SVP 4 Mac image.
- Drag the SVP 4 Mac icon to the Applications folder.
- Install the mpv player and the system libraries required to run SVP:
- For macOS 10.11 "El Capitan" and later: launch the "install mpv.command" batch file to perform an automated installation of the required components with the help of Homebrew. To bypass the security system, click the file with the Control key pressed, and then, in the terminal window that opens, enter the password you use to log into the system.
- For macOS 10.9 and 10.10: see the guide for installation in manual mode.
See more detailed instructions with videos in that article.
SVP 4 Linux Installation
It is recommended to install SVP 4 Linux on a computer running operating system Ubuntu 16.04 or later, 64-bit edition. Please report any issues with SVP running in other Linux operating systems to SVP Technical Support Service. SVP 4 Linux is available only as a binary distribution. Before installing SVP 4 Linux, install the following packages:
- Qt 5.5 or later;
- Vapoursynth;
- Mediainfo;
- Python 3.5;
- Proprietary video drivers with OpenCL ICD (AMD, NVIDIA), or Beignet for Intel;
- mpv compiled with support of Vapoursynth script engine;
- lsof.
To install SVP 4 Linux:
- Download the SVP 4 Linux archive from the SVP website. Unzip the archive.
- Run the installation file with the RUN extension. The installation wizard will start.
- Follow the wizard instructions:
- Select the directory to install SVP.
- If needed, select SVPlight and SVPtube.
- Read and accept the terms of the License Agreement.
Additional Components

For custom installation of the SVP 4 Free, SVP 4 Pro and SVP 4 Linux components, Maintain SVP 4 application is designed. Using it, you can add components that were not selected during the installation of the program. To install additional SVP components:
- Open the main menu via the SVP icon.
- Select Utilities → Additional programs and features.
- In the appeared window, select Add or remove components and click Next.
- Select the components you want to install and click Next.

In SVP 4 Mac, all components are already installed, but the SVPtube and SVPlight modules are disabled by default. To enable the use of SVPtube or SVPlight, follow the steps below:
- Open the Main menu via the SVP icon.
- Select Application settings → Additional options → Extensions.
- Mark the required module; after that SVP will be restarted.
Updates

Updates for SVP, and its components (packages) appear regularly, bringing new functions or fixed issues. Once an update is available, you will see a message in the system notification area and the Updates section containing the list of changes will appear in the SVP Control Panel.
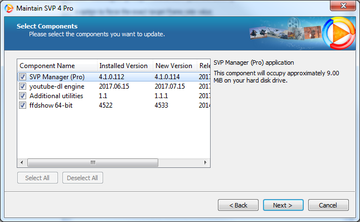
Updating of SVP 4 Free, SVP 4 Pro, and SVP 4 Linux is performed via Maintain SVP 4 application. To update SVP, do the following:
- Open the Updates section in the Control panel.
- Check the list of available updates with their changelogs. Clicking the link More info opens a website of the component’s developer with a more detailed changelog.
- Click the Install via SVP Maintenance tool button. Select Update components in the window that appears. Click Next.
- Select the components you want to update and click Next. SVP will install the selected updates.

To update SVP 4 Mac, you need to download a new version of the DMG image via the License manager (see the Viewing and managing the license section).