Advanced SVP settings
All settings
You can use the Application settings → All settings section in Control panel to view all the SVP options. A large number of options are available for modification from this section only.
![]() Please refer to the list of available options.
Please refer to the list of available options.
WARNING! Do not change options until you are completely sure that you know how this change affects the SVP operation!
Arbitrary changing of options can cause disruption of SVP operation.
To reset the SVP options to the default values, select Reset settings to default section in Application settings → Additional.

SVP options are distributed between several configuration files. Within each file, options are organized hierarchically, that is, in sets of "sections" and "values"; with some "sections" including other "sections".
The entire hierarchical structure of options is presented as a tree. The top level of the tree contains configuration files. The full name of each "value" includes the names of "sections" in which it is contained. For example, the value "frc.frame.crop" is contained in the "frame" section of "frc" branch, which corresponds to "frc.cfg" configuration file.
There are following top-level sections (tree branches) defined:
- "frc" – contains options describing the intermediate frames insertion that are used to generate a script for the player (for example, the frame aspect ratio for cropping).
- "main" – contains SVP general options (for example, the language and keyboard shortcuts).
- "reg" – contains persistent vaules that should be saved after SVP re-installation (in Windows, they are stored in the registry).
- "rt" – contains values that are recalculated each time you start SVP (for example, the path to the working directory). Such values cannot be changed manually.
- "ui" – contains values that are specific to the user interface (for example, last size of the Control Panel window).
- "profiles" – contains a set of profiles. You can save or transfer profiles to another computer by copying the "profiles.cfg" configuration file.
- "lights" – contains a set of patterns for black bars lighting.
- Some sections used by additional modules, for example "tube" for SVPtube and "leds" for SVPlight.
Each "value" can be one of the following:
- Numeric – an integer or a floating point number;
- Boolean – "true" or "false";
- Text string.
To change the "value", click it in the Value column, type a new value, and press Enter. However, you cannot change the "value" type - for example, you cannot enter arbitrary text for a "value" of the "integer" type.
Management of the Script Generation
WARNING! Please skip this section if you do not know what "JavaScript" or "Avisynth" mean.
SVP operates according to the following algorithm:
- SVP collects all the necessary information about the system, such as CPU performance, availability of GPU and number of connected monitors with their resolution and refresh rates.
- Video playback in the player starts.
- SVP determines parameters of the video playing back – the frame size, codec type, and so on.
- The necessary video conversion operations (image cropping, scaling, and removing of black bars) are determined.
- Based on this data, a matching profile is selected, containing options for the frame rate conversion.
- All the available data including the profile options, conversion options, player data, and some system parameters are passed to the "generator" written in JavaScript language.
- The "generator" creates a program ("script") in the Avisynth or Vapoursynth scripting language. This script uses the functions of SVPflow modules. The script is passed to the video player.
- The player applies the specified video conversions and inserts intermediate frames by using the built-in Avisynth or Vapoursynth video filter.
SVP allows you to alter script creation described by Step 7 and perform the following actions:
- directly specify the values of SVPflow arguments;
- enter or modify the input variables for the Avisynth/Vapoursynth script "generator".
To view the resulting script code, select the Last generated script option in the Information → Additional information submenu of the Main menu.
You can add new options (parameters) that will be available either in the My options submenu of the Main menu or in the User defined options section of the video profile. If you change them, the corresponding values will be passed to the "generator" via additional variables.
To add a custom option:
- Open the Application settings section in SVP Control panel and click theUser defined options button.
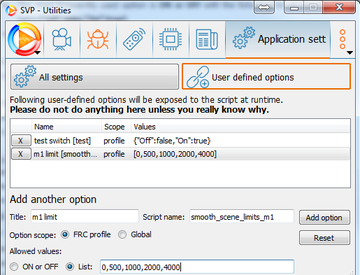
- Create a new option as follows:
- Specify an arbitrary name in the Title field; this name will be visible in the menu or in the video profile;
- In the Script name field, specify the name of a corresponding JavaScript variable which will be available to the "generator";
- Select the scope of the option:
- Global - if the option should be defined globally for all the video. In this case it will be changed in My options section of the Main menu;
- FRC profile - if the option should have different values based on video profiles.
- Specify a list of valid values in the form of an associative array in JSON format: {"Option 1":value_1, "Options 2":value_2,…}. Then, if you select Option 1 in the Menu, the appropriate JavaScript variable will be assigned value_1, and so on. Examples:
- The most frequently used option is ON or OFF with the following list of option-value pairs {"Off":false,"On":true}.
- A simple list of option names, separated by commas {"Option 1","Option 2","Option 3"} is equivalent to {"Option 1":0,"Option 2":1,"Options 3":2}
- Click the Add option button. The new parameter will be added if all fields are filled in correctly. In case of an error, check if the name of the JavaScript variable is correct and check syntax of the values list.
- Modify the "generator" code to enable it to use the new variable. You can modify the following files from the "script" subfolder which is in the SVP installation directory:
- base.avs and base.py – the common parts of scripts for Avisynth and Vapoursynth respectively, which are directly copied to the final script.
- generate.js – the source code of the "generator". The script for Avisynth is generated by invoking the "gen_avs()" function, while the script for Vapoursynth is generated by invoking "gen_vs()" function.

In case an error occurs when the modified JavaScript code is executed, an entry with the JavaScript interpreter error message will appear in the Events log. To specify the values of the SVPflow arguments, use one of following methods:
- Locate the override.js file in the "script" subfolder, open it in a text editor, and enable (i.e. remove the "//" comment sign) the string containing the required parameter. For more information, see the description of the SVPflow modules.
For example, to always use SVP shader equal to 13. Standard, regardless of profile settings, enable the string "smooth.algo = 13".
- In the User defined options section, create a variable with a special name – take the option name from the override.js file and replace all "." with "_" in it.

For example, to be able to change the "smooth.scene.limits.m1" from the video profile, add the following option:
- Title: "M1 limit"
- Script name: "smooth_scene_limits_m1"
- Option scope: "FRC profile"
- Allowed values: "0,500,1000,2000,4000"
