SVP3:SVPlight
This is a legacy SmoothVideo Project (SVP) ver.3 user manual.
Contents
Installation

Prior to using SVPlight you'll need:
- some kind of lighting hardware (Lightpack, Paintpack, etc)
- installed, configured and working SmoothVideo Project (SVP) 3.1.6 or later.
After the installation the SVP Manager will be restarted and additional options will be added to the main menu.
Get familiar with SVP!
This User manual does not cover SVP, but despite it the most important topics will be mentioned here:
- First your favorite video player has to be configured to work with SVP. Basically the "ffdshow raw video filter" has to be added to your player's filter chain. The SVP full version (not the "Core" version) installs a pre-configured MPC-HC video player. You can determine whether SVP is functional when its tray icon turns green during a video playback.
- SVP is about HFR (high frame rate) but some people may not like if for some reasons. If you belong to those people, please feel free to turn HFR off and keep SVPlight in use (and/or software black borders lighting feature). To do this, please change Frames interpolation mode to Off in Profile settings dialog window, double-clicking the SVP tray icon.

Initial setup

- Close Prismatik (or any other control software) prior to running this Settings app if you want to use Lightpack engine;
- Choose SVPlight settings... from SVP's main menu;
- Choose LEDs lighting system (see below) attached to the computer and ensure that the hardware status in the top right corner shows a green "OK";
- If you have several screens attached, please choose the one with LEDs applied. Note: you'll need to re-adjust the lighting zones if you modify this setting!

- Initialize lighting zones in one of two possible ways:
- Import a profile from either Prismatik or Ambibox software (if it is installed):
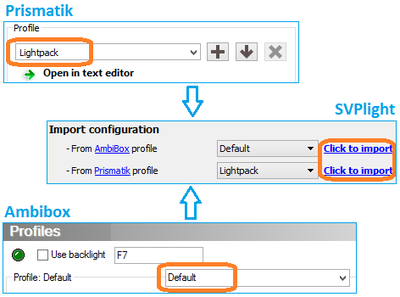
- or choose the actual number of LEDs (or independent LED zones) and press Click to set label. You can enter the exact number after choosing the Custom... option:

- Import a profile from either Prismatik or Ambibox software (if it is installed):
- The SVPlight application will switch to Adjust page.


LED lighting engines
- Lightpack - direct controlled Lightpack, not available for simultaneous use with another control software.
- Prismatik - control via a running instance of Prismatik. Prismatik is switched to "blocked" state when SVPlight is working.
- Paintpack - control via k8062d.dll library and k8062e.exe which can handle several control applications. Please note that you should set AmbiBox to "Paintpack DMX" to use SVPlight while AmbiBox is running.
LEDs adjustment

On the Adjust LEDs tab each colored arrow is representing one LED (or light zone). You need to reorder the on-screen arrows to match the actual LED position (or middle of light zone) as accurate as possible.
- You can switch all LEDs on/off at once with
 button. Note that each LED color matches the color of an arrow;
 - Hovering the mouse over the color arrow the LED will change it's color to either white or color of the arrow, depending on current switching state;
- You can freely drag the color arrows along the screen borders;
- To easy the adjustment you can switch to full-screen mode using the
 button;
 - For a quick test of color arrows position, please use the "running lights" option, pressing the
 button.
All changes to color arrows positions are applied instantly, so the application can be closed any time.
Additional options

Colors
- Brightness: to control the maximum LEDs brightness value. The range is from 1/5 to full brightness. You can see the changes if the lights are turned on
 .
. - Make dark scenes brighter: a kind of gamma correction allows to increase luminosity on low-brightness scenes.
- Saturation: controls LEDs saturation value.
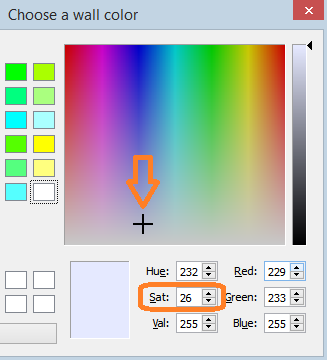
- Color correction: specify the color of the wall behind the screen in case it's not white. Keep the cross at the bottom of the color field (with low "Saturation" values) otherwise the color correction can become too strong. The brightness of selected color is ignored.

Motion
- Smooth transition between colors: it turns on or off some kind of light color averaging for more fluent colors. The range is from OFF to averaging on approx. 1.5 seconds interval. You can see how this value affects real lights if "running lights" option
 is enabled.
 - Presentation delay: adds delay (in frames) between the changes in the video frame and actual LEDs switching.
Video playback
To use lighting at playback you just need to turn select Use SVPlight in the main menu. Also there's an adjustable hot key under Settings->Change default hotkeys.
It's possible to adjust color and motion options on-the-fly, selecting SVPlight settings... menu item while playing a video and a limited version of SVPlight settings dialog will appear:
