Resizing an Image
The cropping function allows you to remove black bars from the video frame or to adjust the video frame size to the screen size.
The image scaling function changes the size of the video frame without changing the aspect ratio (the proportion between the width and the height of the frame). SVP performs cropping and scaling (even when the frame rate conversion function is off) in the following order:
- automatic cropping of black bars;
- cropping to the specified aspect ratio;
- scaling.
Image Cropping
Image cropping changes the aspect ratio of the video and discards part of the original image.
Cropping is necessary for:
- Getting rid of black bars on the video edges. Black bars inside the video frame interfere with the frame rate conversion function, as they increase the CPU usage and result in wave gray artifacts appearing at the frame edges.
- Adjusting the video to the screen size. For example, in case you play back an old 4:3 video on a modern widescreen TV.
To crop an image:
- Open the SVP Main menu, the Video frame submenu.

- If you want SVP to automatically detect black bars at the frame edges and cut them off, select Detect and cut off black bars.
- If you want to crop the video to completely fit your screen, select Crop to the screen aspect ratio. In this case, too large part of a visible image can be lost. Cropping is not applied if you select Keep aspect ratio.
- Select other modes and additional cropping options in the Frame size section of SVP Control Panel, which opens when you select Advanced controls.
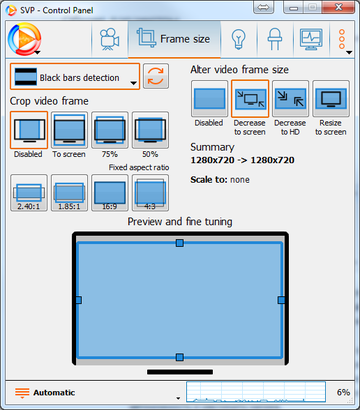
During video playback, a blue frame is displayed over the image, indicating the area of the frame that will remain after the cropping is done.- Hold the Black bars detections button to select one of the Black bars detection modes:
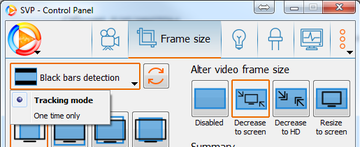
- Tracking mode – the black bars detection is performed continuously; if a change is detected, the cropping mode will be immediately changed. This mode can be used for video with a variable aspect ratio (for example, IMAX versions of movies), but frequent switching can detract you from watching the video.
- One time only – the detection of black bar is performed only once to exclude mode switching during playback. To force a repeat detection, click the Force re-detect black bars button, or press the same hotkey.
- Hold the Black bars detections button to select one of the Black bars detection modes:
- Select the options for the cropping to the specific aspect ratio in the Crop video frame section:
- Disabled – any cropping is disabled (similarly to Keep aspect ratio in the Main menu).
- To screen –- to crop the video to screen aspect ratio, similarly to Crop to the screen aspect ratio in the Main menu.
- 75% or 50% – select one of these values to crop the video to the screen aspect ratio by 75% or 50%. Such cropping approximates the frame aspect ratio to the video aspect ratio. This compromise between disabled cropping and cropping to the screen aspect ratio allows you to increase the screen filling without losing too much of the visible image.
- 2.40:1, 1.85:1, 16:9, 4:3 – select one of these values to crop the video to the fixed screen aspect ratio.
- To specify a custom value, use the "frc.frame.crop" parameter in the Application settings section of the Control Panel.
- The selected cropping mode is schematically shown on the Preview and fine tuning diagram. To change the cropping borders during video playback, drag the markers over the diagram to the desired positions.


Image Scaling
Frame scaling is used to reduce the CPU load when the frame rate conversion function is active. For example, scaling can be used if the video frame size is larger than the screen size measured in pixels. Preliminary reduction of the frame size made before the calculation of intermediate frames allows using higher-quality parameters for this calculation. To scale an image:
- Open the SVP Main Menu, the Video frame submenu.
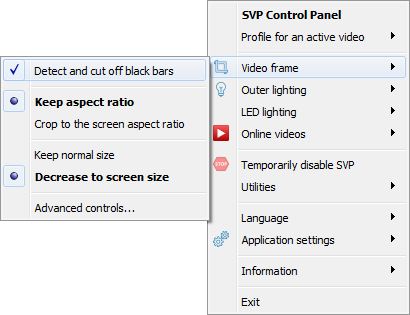
- Select the scaling mode:
- Keep normal size –- does not scale the image.
- Decrease to screen size –- reduces the image to the screen size. If the image size is already smaller than the screen size, scaling is not performed.
- If you need to choose another scaling mode, select Advanced controls in, which open the Frame size section of SVP Control Panel.

Select the image scaling mode in the Alter video frame size block:
- Disabled –- to disable scaling (similar to Keep normal size in the Main menu).
- Decrease to screen –- to reduce the frame to the screen size (similar to the option in the Main menu).
- Decrease to HD –- to reduce any video to a width of 1280 and/or a height of 720 pixels. This option can be used for systems with poor performance that do not have enough power to calculate quality intermediate frames for high-definition video.
- Resize to screen –- to scale the image up or down to fit the screen size. Unlike the Decrease to screen mode, this mode also increases the frame size if the frame size is smaller than the screen size.
- To select another mode, use the "frc.frame.resize" parameter in the Application settings section of the Control Panel.